Some time back, Sean wrote a white paper on SSIS package design, and when to split one large package into multiple packages.
HERE is that white paper, for your edification. Enjoy!
Some time back, Sean wrote a white paper on SSIS package design, and when to split one large package into multiple packages.
HERE is that white paper, for your edification. Enjoy!
When you’re in an environment where you need to add user accounts to different servers on a regular basis, it can be a pain to manage the requests because you have to connect to each server, and either use the GUI to add the account, or write the statement yourself. Now, this normally isn’t a big deal, but if you have to do it several times a day that extra time it takes to go through the steps can start to get old.
So here I’ve written a stored procedure that lets you manage the process from a single location. Now, I’m going to caution you up front that this SP is run from a server where the service account already has admin rights on the servers you’re targeting, so you need to make sure this SP is locked down. Make sure that only DBAs you trust and who are responsible can run this. And if you can, make sure even the ones you trust can’t alter it because it logs its actions and you don’t want anyone being able to turn the logging off.
Ok, you’ve been warned and I don’t want any lawsuits or emails telling me that someone did something that messed things up in your shop because it’s all on you. And while I’ve tested this and run it in a few locations, make sure you test it yourself first before relying on it for any real production scenario.
The legal stuff is out of the way so let’s get into the details of the SP itself.
CREATE PROCEDURE dbo.AddServerPerms
@ServerName varchar(200),
@Action varchar(10),
@UserAcct varchar(100) = 'domain\SMcCown',
@Run bit = 0
AS
/*
This SP allows you to add/drop a user to sa on any box you like. It makes the process easier than connecting to the server each time.
Of course, you should always be careful about adding sa accts to servers so you should lockdown the use of this SP to only DBAs that you trust,
and who are responsible.
This SP also logs its actions so you can see which accts were added/dropped, when, and by whom.
This is also meant to be run from an acct that currently has sa on the server.
So replace the Execute as stmt with the acct of your choice.
This is the log table that needs to be in place before running this SP.
CREATE TABLE dbo.SASecurityLog
(
ID int identity(1,1),
ExecutionDateTime datetime,
ServerName varchar(200),
AcctName nvarchar(200),
Action varchar(10),
Code nvarchar(1000),
RunBy nvarchar(200)
)
*/
Execute as Login = 'sa';
DECLARE @SQL varchar(400),
@TotalSQL varchar(1000),
@TotalDropSQL varchar(1000),
@DropSpidSQL varchar(200),
@RunErrors nvarchar(max),
@Result varchar(10);
If UPPER(@Action) = 'ADD'
BEGIN
SET @SQL = 'CREATE LOGIN [' + @UserAcct + '] FROM WINDOWS; ALTER SERVER ROLE [sysadmin] ADD MEMBER [' + @UserAcct + '];'
END
If UPPER(@Action) = 'DROP'
BEGIN --Drop
SET @SQL = 'DROP LOGIN [' + @UserAcct + '];';
--------------------------------------------------------------------------
-----------------------BEGIN Get SPIDs------------------------------------
--------------------------------------------------------------------------
--Get SPIDs to kill.
SET @DropSpidSQL = 'SELECT SPID from sys.sysprocesses WHERE loginame = ''' + @UserAcct + ''';';
CREATE TABLE #SPIDs(col1 varchar(1000));
SET @TotalDropSQL = 'sqlcmd -S "' + @ServerName + '" -Q "' + @DropSpidSQL + '"'
INSERT #SPIDs(col1)
EXEC xp_cmdshell @TotalSQL;
DELETE #SPIDs
where col1 like '%--%'
OR col1 like '%rows affected%'
OR col1 IS NULL;
--------------------------------------------------------------------------
-----------------------END Get SPIDs--------------------------------------
--------------------------------------------------------------------------

--------------------------------------------------------------------------
-----------------------BEGIN Drop SPIDs-----------------------------------
--------------------------------------------------------------------------
----You can't drop a login if it's currently logged in, so here's where we
----drop all the SPIDs for the current user first.
----There's more than one way to do this. I chose this one because I didn't
----want to cram all this cursor syntax into D-SQL, and I didn't want to require
----a script on the drive to be managed. While that may be a cleaner way to code
----this solution, this method is more portable and doesn't require any extra setup.
DECLARE @currSPID varchar(100);
DECLARE SPIDs CURSOR
READ_ONLY
FOR SELECT col1 FROM #SPIDs
OPEN SPIDs
FETCH NEXT FROM SPIDs INTO @currSPID
WHILE (@@fetch_status <> -1)
BEGIN
SET @DropSpidSQL = 'KILL ' + @currSPID + ';'
SET @TotalDropSQL = 'sqlcmd -S "' + @ServerName + '" -Q "' + @DropSpidSQL + '"'
EXEC xp_cmdshell @TotalDropSQL;
--print @TotalDropSQL
FETCH NEXT FROM SPIDs INTO @currSPID
END
CLOSE SPIDs
DEALLOCATE SPIDs
DROP TABLE #SPIDs;
--------------------------------------------------------------------------
-----------------------END Drop SPIDs-------------------------------------
--------------------------------------------------------------------------
END --Drop
--------------------------------------------------------------------------
-----------------------BEGIN Log Action-----------------------------------
--------------------------------------------------------------------------
INSERT dbo.SASecurityLog
(ExecutionDateTime, ServerName, AcctName, Action, Code, RunBy)
SELECT GETDATE(), @ServerName, @UserAcct, @Action, @SQL, SUSER_SNAME();
If @Run = 0
BEGIN
SELECT @SQL AS AcctSQL;
END
--------------------------------------------------------------------------
-----------------------END Log Action-------------------------------------
--------------------------------------------------------------------------
--------------------------------------------------------------------------
-----------------------BEGIN Run Action-----------------------------------
--------------------------------------------------------------------------
If @Run = 1
BEGIN --Run = 1
CREATE TABLE #Results(ID tinyint identity(1,1), col1 nvarchar(2000));
SET @TotalSQL = 'sqlcmd -S "' + @ServerName + '" -Q "' + @SQL + '"'
INSERT #Results(col1)
EXEC xp_cmdshell @TotalSQL;
--------------BEGIN Get Run Errors------------------------
SELECT @RunErrors = STUFF((SELECT ' ' + col1
FROM #Results AS T1
ORDER BY T1.ID
FOR XML PATH('')), 1, 1, '')
FROM #Results AS T2;
If @RunErrors IS NULL
BEGIN
SET @Result = 'OK';
END
If @RunErrors IS NOT NULL
BEGIN
SET @Result = 'FAILED';
END
--------------END Get Run Errors---------------------------
END --Run = 1
--------------------------------------------------------------------------
-----------------------END Run Action-------------------------------------
--------------------------------------------------------------------------
select TOP(1) @Result AS Result, @RunErrors AS Errors, * from dbo.SASecurityLog ORDER BY ExecutionDateTime DESC;
Now there’s the code for you to use at your leisure. I’m going to discuss some important parts below by line number.
4: You want to be able to use the same SP to add or drop the acct so you can pass the action in.
26: I’ve set this up to run as sa because the service account on the central box has sysadmin on all the servers in the shop. A good scenario for this is when you have a server that’s running a performance app and needs to have sysadmin on all your SQL boxes. I’ll discuss the security implications of this in a section below.
33-39: Depending on the action you take, create the proper syntax.
44-52: There’s more than one way to do these next couple sections of code. I chose this one because I didn’t want there to be any external setup. You should just be able to install the SP and start using it. So here I’m getting the list of SPIDs taken up by the acct on the target server. You can’t drop a user acct if it’s currently logged in. So getting the list of SPIDs to delete and then cursoring through them to kill them is what we’re doing here and in the next couple sections. It’s possible that one of the SPIDs could disconnect and another take it’s place on the server between the time that you get the SPID list and when it gets killed, but it’s unlikely.
66-82: This is the cursor that kills the SPIDs for the current user from the target server. Again, this could be done a different way and if you really don’t like this then rewrite this section.
90-96: We’re logging the action before we run it. It’s important to log the action before the SP gets a chance to error out for some reason.
103-108: This is where we actually run the stmt against the target server. Notice we’re inserting the EXEC stmt into a #table so we can capture the results. If the stmt is a success it returns NULL so it’s easy to see if it failed.
110-122: If the stmt fails for any reason we captured the error in the previous section so we can put those results into a var and use that to set a status. The use of STUFF here is how I commonly do this and it requires the ID column, so if you do this on your own, the code is easy to paste into another SP.
128: Return the results back to the user.
Managing accounts in an enterprise can be time consuming, and the more servers you have, the more time consuming it can be. This is why a lot of shops opt for using a single service account for SQL services. However, this is a very dangerous practice because now you have a single account that runs every server in your network so if there’s a security breach, you have a big problem. You have many processes running under this account so there are literally hundreds, if not thousands of opportunities for an attacker to do damage.
However, sometimes it’s necessary to run a centralized management server with an account, and give that account sysadmin on each SQL Server. Quite often 3rd party performance monitors need these elevated rights. There’s a difference though between having a single account with sa and having all the servers running under the same acct. In the centralized server scenario, the only processes running on that account are the ones for the application, and often they’ll be running only on the central server. Therefore, there won’t be any linked servers, jobs, SPs, or anything else running under that account. So it’s more unlikely that you’ll have a breach against that account. It can also be locked down so only the DBAs know it whereas often times many people know the service account passwords. And again, there are many chances for security to get compromised with all of the processes that are likely running under it.
It’s also easier to change the password for that single centralized service account as you don’t have to change it across 100 servers. So you’re most likely going to be able to adhere to better security principals.
Now, for the record… you should never run all your services under the same user account. Always take the extra effort to have a separate account for each server. And at the very least, you can group the servers by application and have a single service account for each application. It’s not as good as having one for each box, but you’ll at least minimize the damage should you be compromised.
This blog is about the fallout from a really bad incident that happened with an SRS server. And it has a very valuable lesson in there as well. I was recently talking to a customer about a problem they had getting their SSRS site to load. As it turns out the problem was that someone had changed the account the service was running under and that broke the encryption for the site. Here’s how it played out. They’ve got a need to be able to access shares on remote servers and the account that SSRS was running under was a local account. So it couldn’t be given permission to any of the shares. That’s why they changed the service account. Now here’s what happened.
Initially they were sunk but SSRS was on a VM and they were lucky enough to have backups. So they restored the backup to another VM and renamed the server so they could get it on the network. Then they were able to backup the SSRS encryption key and restore it to the original server. After that, everything worked right away. So the first takeaway you have here is to always backup your SSRS encryption keys. Always. I’ve had this happen a few times and we didn’t have backups of Windows we could restore so we had to re-enter all the passwords for our data sources. On one box it wasn’t that big of a deal and on another one it was quite a big pain. So always backup your encryption keys.
That’s not really the bad part though. When I had them backup their current encryption key, I told them that I really like to keep a naming format for my encryption key backups. That format is SSRSEncryptionKey-ServiceAcct–Date.snk. And when they were typing their filename, the name they ended up with was this:
SSRSEncryptionKey-DomainAdmin-20170503.snk.
If you paid close attention, you’ll notice the ‘DomainAdmin’ portion of that name. Yep, you got it right… they were running SSRS under the domain admin account. The Windows guy thought that it would be too much trouble to manage the permissions and get everything right on all the shares and DBs that it needed to access.
So this is when I pretty much lost it. These guys were running SSRS under a domain admin account because they were too lazy to do the right thing. It’s unthinkable. There may be some reasonable excuses why you’re not able to change your current security model to something better. You may even be able to convince me that you’re not just being lazy. But to actively be lazy about your security isn’t something I’m going to take lying down. Hey, I know it’s your shop, and I know you can ultimately do whatever you like, but I’m going to make sure you know what you’re doing.
So to those of you out there who are even considering being lazy about security, don’t. Do what you need to do. You won’t get it right all the time. There’s a lot of misinformation out there and there are a lot of pitfalls. So not getting it completely right is ok. You do what you can when you can. but laziness will never be an excuse.
 MinionWare will release Minion CheckDB on Febuary 1, 2017!
Minion CheckDB is the third piece of our free backup and maintenance tools, rounding out the list with Minion Backup and Minion Reindex. CheckDB will have the same native interface, the same configurability, and the same rich scheduling introduced in Minion Backup. And of course, it will have a the same kind of visionary features that users have come to expect from MinionWare products, like:
What’s more, we will also release Minion Backup 1.3 on that date! New MB features include:
Subscribe to the MinionWare newsletter for news and updates about Minion Enterprise, backup and maintenance, and more.
It’s been a year since we officially launched MinionWare and launched our flagship product, Minion Enterprise. Since then we’ve hit many SQL Saturdays, and a few other events, to spread the word. And things are looking bright! We’ve been received openly by the community we’ve given so much time to, and we’re finding our foothold as a vendor.
You guys know our business model: Give away as much as you can. We started by giving away our world-class maintenance tools (Minion Backup and Minion Reindex), and we’ve committed ourselves and our company to only making them better. With the excitement we feel about the upcoming release of Minion CheckDB and the fact that we just passed our 1 year anniversary, we’ve decided to do something bigger…give away Minion Enterprise.
From now until 5:00pm (Central Time), on July 15, 2016, anyone who emails us a request will get 3 free Minion Enterprise licenses.
We really want to say thanks to the SQL community worldwide and we couldn’t think of a better way. Somehow merely saying thanks just didn’t seem big enough. So, thanks…and have some free enterprise management software for life.

Of course there are just a couple caveats so see the restrictions below:
 We’re having a Minion Backup webinar on Wednesday, June 1 at 12:00 PM. Register here!
Enterprises have increasingly complicated backup needs. With different data centers, high availability nodes, development refreshes, and more thrown into the mix, a DBA can almost keep a full time job simply making a backup routine that does everything it needs to do. But we’ve done that for you.
Minion Backup is a free community tool that has more than enough features to handle even your toughest scenario.
In this webinar we’ll show you how this FREE tool by MinionWare can meet your scalability and HA/DR needs with almost effortless management. We’ll show you how Minion Backup can:
Come see why Minion Backup is almost literally taking the SQL community by storm, and why it’s the new diamond standard for backups in SQL Server.

That’s it. Just be ready to work with us. Many of you have been part of our betas before so you know we’re very responsive and we do our best to give you the product you want to use. We’re going to try to update the beta monthly, but possibly more often if we have an important feature we need to get into your hands.
We’ve got to finish up some details, make a video, and maybe some base-level docs so we’re going to get it into your hands probably late next week, but we want to know who’s going to be in the program. So don’t wait, get your email into me soon and we’ll let you know within a day or so whether you’ll be accepted into this cycle. It’s going to depend on whether you’re going to be active.
I want to show you a great piece of code to truncate and shrink all your log files. The biggest question you always ask is why should you shrink your log files? It’s been drilled into everyone’s head that shrinking log files is bad because you can cause too many VLFs, and of course there’s the zeroing out that happens when they grow.
OK, so let’s answer that question. There are a couple reasons you’d want to shrink all the files to a small size.
1. Let’s say you’ve got to move some logs to another drive, or all of the logs. If left unchecked your logs may have occasion to get rather big. So you could honestly have some pretty large log files lying around. And when you’ve got a downtime to move these files, you don’t need to extend it by copying really large (yet mostly empty) log files. So it’s best to shrink the files so you can copy them over quickly.
2. Also, if you’re trying to restore a prod DB to dev or QA and you don’t have the same kind of space over there then you’ve got to shrink the file. Why try to restore a 90GB log file that’s only 1% full? So shrink the log, take the backup, and then it’ll restore.
3. And of course if you’ve got several logs on the same drive and one of them gets blown up to an enormous size, it may leave the drive too full for the others to expand. There’s no reason to keep a 50GB or 90GB file mostly empty just because you’re afraid of a VLF problem you probably won’t even have.
So there are 3 reasons you may need to truncate log files. Now here’s the script to actually make the change. It’s simple but it gets the job done.
This is one of those times when a cursor is the perfect solution for the job. I know it’s popular to bad-mouth cursors but a lot of times they’re perfect for this type of admin work. However, on top of the cursor solution there’s also a different way to do it. The cursor solution will allow you to run the code for each DB. You can also add in some error handling, and other logic if you like. So ultimately it can be built into a more complete solution. But I’m a big lover of code that writes code. So first, I’m going to show you a simpler solution using string building in a query.
SELECT 'USE [' + DB_NAME(database_id) + ']; ' + 'DBCC SHRINKFILE([' + name + '], 1024)'
FROM sys.master_files
WHERE type_desc = 'LOG'
AND database_id > 4
ORDER BY DB_NAME(database_id) ASC
You can see that it’s a simple script that gets the job done. If you’re running it from PowerShell you can run the results in your PS loop with no problems. You could even write the results to a table and use some other automated process to pick up the statements. Or, in cases like this, my favorite is to just select and run them by hand.
Now for the cursor version. Again, you can put in lots more logic in here and you have more control over the entire process in general. So they’re both worthy methods to have.
-----------------------------------------------------------------------------------------------
-----------------------------------------------------------------------------------------------
---------------------Truncate and shrink all Log Files-----------------------------------------
-----------------------------------------------------------------------------------------------
-----------------------------------------------------------------------------------------------

/*
The biggest question I get with this is why you would want to shrink all log files.  There's a question of VLFs and log growths, etc.
Well, a simple use case for this is when you need to move a bunch of log files to a new drive and you don't want to be up all night.
Shrink them down and transfer just a few gigs instead of a few dozen or even into the hundreds of gigs.

Another reason is to restore a DB to a dev box or something.  If the drive isn't as big as it is on your main box then you'll need to shrink the log so you can actually restore.
Then take the backup.

So the fact that it may be good to leave your logs alone for the most part, there are times when it's best to trim them.
Of course, the obvious other reason is space.  If you've got a lot of log files on a single drive then you need the space to be managed a little tighter and if you've got one that got
blown out really big for some reason then there's no reason the others have to suffer because you refuse to shrink it.

*/


DECLARE
@curDBName sysname,
@curFileName VARCHAR(2000),
@SQL varchar(4000),
@FileSize VARCHAR(10);

SET @FileSize = '1024'; -- The size you want the files to be shrunk to.

Declare DBName Cursor For
	SELECT DB_NAME(database_id) AS DBName, name AS FileName
	FROM sys.master_files
	WHERE type_desc = 'LOG'
	AND database_id > 4
	ORDER BY DB_NAME(database_id) ASC


Open DBName
Fetch Next From DBName INTO @curDBName, @curFileName

while @@Fetch_Status = 0

	Begin

		SET @SQL = 'USE [' + @curDBName + ']; '
		SET @SQL = @SQL + 'DBCC SHRINKFILE ([' + @curFileName + '], ' + @FileSize + ')'

PRINT @SQL;
--EXEC (@SQL);

Fetch Next From DBName INTO @curDBName, @curFileName
END

Close DBName
DeAllocate DBName

GO
This is a critical time in Chicago’s history. At no other time have they been in more danger of having the mafia rise up and take over the city. Gangsters like Capone are going to be more powerful than ever within the next 2 weeks and there’s little the police can do to stop it. That doesn’t mean that they can’t be stopped. What we need are some really strong enterprise scripters out there. DBAs who know how to get the job done so they can go to lunch on time. With all this extra DBA presence in local restaurants on a regular basis, the mafia won’t have a chance to take hold. This is critical people, don’t let this happen. Sign up for our Enterprise Scripting Precon. The life you save may be your own.
You can sign up here: https://www.eventbrite.com/e/the-enterprise-scripting-workshop-a-sql-saturday-chicago-precon-tickets-19917182830
If you let this opportunity go by, then we’re not responsible for what happens to the city of Chicago, or maybe even your family.
In actuality though it’s doing exactly what it’s supposed to, and it’s following the letter of the Minion Backup law. That law is “Once you’re at a level, you never go back up”. Let me show you what I mean.
Take a look at this sample Minion.BackupTuningThresholds table.
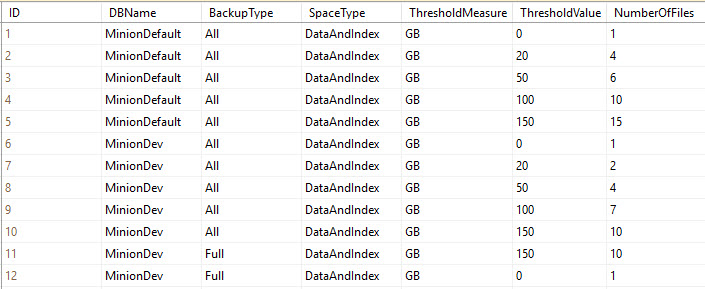
Ok, in the above table we’ve got some tuning rows. This is a truncated version of the table, but it’s all we need to demonstrate precedence. We’ve got two rule sets here; one for MinionDefault (the row that provides all the default configuration settings), and one for MinionDev (a specific database on my server).
At the most basic level, the precedence rule states that once there is an override row for a database, that database will never leave that level…it will never default back to the default row. So in this example, MinionDev is at the database level for its settings, so it will never go back up to the more generic MinionDefault row. Once you’re at a level, you stay at that level.
I’m going to explain how these rows work, and why they are the way they are. Notice that for both levels (that is, for the MinionDefault rows, and for the MinionDev rows), there is what we call a zero row. This is where the ThresholdValue = 0. The zero row is especially important for the MinionDefault row, because this is what covers all DBs; it’s quite possible that you could get a database that’s less than your lowest threshold value.
In the above table, the lowest (nonzero) threshold value for MinionDefault is 20GB. That means that no DBs under 20GB will get any tuning values. Without any tuning values, the number of files would be NULL, and therefore you wouldn’t be able to backup anything…they wouldn’t have any files. So setting the zero row is essential.
And, since each DB stays at that level once it’s got an override, then whenever you put in a DB-level override it’s an excellent idea to give that DB a zero row as well. It may be 50GB now, but if you ever run an archive routine that drops it below your lowest threshold, then your backups will stop if you don’t have that zero row to catch it. Did I explain that well enough? Does it make sense?
That’s how the rule is applied at a high level between DBs. Let’s now look at how it’s applied within the DB itself.
As I just stated above, you should really have a zero row for each database that has an override row (you know, where DBName = <yourDBname>).
Let’s look at MinionDev above. It has a BackupType=All set, and a BackupType=Full set. The All set takes care of all backup types that don’t have backup type overrides. So in this case, the All set takes care of Log and Diff backups, because there’s a specific override for Full. Get it? Good, let’s move on.
Notice that MinionDev has a zero row for the All set, and a zero row for the Full set. This is essential because following the rules of precedence, once it’s at the MinionDev/Full level, it doesn’t leave that level. So again, if there’s a chance that your database will fall below your lowest tuning threshold – in this case it’s 150GB – then the backup will fail, because there are no tuning parameters defined below 150GB. This again is why the zero row is so important: because it provides settings for all backups that fall below your lowest tuning setting.
And, if you were to put in a BackupType=Log override for MinionDev, it would also need to have a zero row. I could argue that it’s even more important there because it’s quite possible that your log could be below your tuning threshold.
That’s how the precedence actually works in the Minion.BackupTuningThresholds table. The argument started when Jen thought that it should move back up to the All set if a specific BackupType override falls below its tuning threshold. So in other words, in the above table, she wouldn’t require a zero row for the MinionDev-Full set. Instead, if the DB size fell below the 150GB threshold, she would move it backup to the MinionDev-All set, and take the lowest tuning threshold from there.
She said that it wasn’t in the spirit of the precedence rules to make the setting quite that pedantic. So after hours of arguing, drawing on the board, making our case, sketching out different scenarios, etc… we just kinda lost steam and moved on, because she had to get ready for her talk.
The point is though that this is the way it currently works: once it’s at its most specific level, it stays there. So, if you have tuning settings for specific backup types, you’d be really well served to have a zero row for each one just in case.
And I’ll also note that BackupType is the lowest granularity. So, Day and Time (another config option in this table) have nothing to do with this setting. You need to concentrate on the DBName and BackupType. Everything else will fall into place.
Now, I know it sounds like a contradiction, but there is just one place where I break this rule. I call it the FailSafe. With the FailSafe, it’s possible to have specific overrides and still get your tuning thresholds from the MinionDefault zero row. Here’s why:
This is a rather nuanced config in Minion Backup, and it’s fairly easy to get something wrong and wind up without a backup. I didn’t want that to happen. So, if you do something like leave your zero row out for an override level, and your DB falls below your lowest threshold setting, you would wind up without any backup because there isn’t a number of files to pass to the statement generator.
Failsafe says, if you screw up and don’t have a tuning setting available, MB will grab settings from the MinionDefault Zero Row.
In this situation, I kick in the FailSafe mechanism, which pulls the tuning settings from the MinionDefault zero row. At least you’ll have a backup, even if it’s slow.
(That was one of Jen’s arguments: that a FailSafe is a great idea, but she wants it to come from the DB-All set instead of the MinionDefault-All set. I don’t know, maybe she’s right. Maybe that’s more intuitive. I’ll have to think about it. It wouldn’t be that big of a change really. I could walk up the chain. In the above table I could try the MinionDev-All zero row and if that doesn’t exist then I could use the MinionDefault-All zero row. What do you guys think?)
So why not just hardcode a single file into the routine so that when this happens you’re backing up to that single file? The answer is: flexibility. Your MinionDefault zero row may be set to 4 files because all your databases are kinda big and you don’t ever want to backup with fewer than that. So, set your MinionDefault zero row to something you want your smallest DB to use. If that’s a single file, then ok, but if it’s 4 or 6 files, then also ok. That’s why I didn’t hardcode a value into the FailSafe: It’s all about giving you the power to easily configure the routine to your environment.
Takeaways:
Ok, that’s it for this time. I hope this explanation helps you understand the reasoning behind what we did.